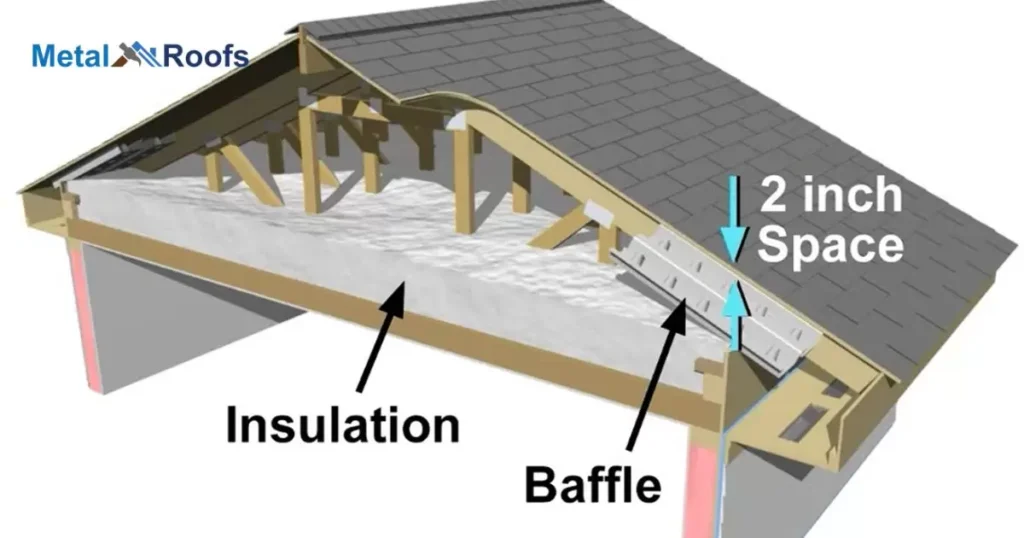
Attic ventilation baffles are plastic or cardboard channels installed along eaves to maintain airflow. Baffles prevent insulation from blocking soffit vents, allowing attic ventilation for moisture and heat control.
Need to improve attic ventilation and moisture control? Installing How To Make Attic Ventilation Baffles? is the solution! Learn how these plastic or cardboard channels keep insulation from blocking eave vents, enabling air to flow freely along the underside of the roof. Get step-by-step instructions for DIY baffle installation.
Proper attic ventilation is key for moisture and heat control. Keep reading to learn how installing ventilation baffles along the eaves can maximize air flow and prevent ice dams. Get step-by-step instructions for DIY plastic or cardboard baffle installation.
Key Takeaways
- Craft baffles with cardboard, scissors, and staples
- Ensure accurate measurements for a secure fit
- Maintain routine inspections and debris removal
- Optimize insulation levels for continuous and effective attic ventilation
Introduction To Attic Ventilation Baffles
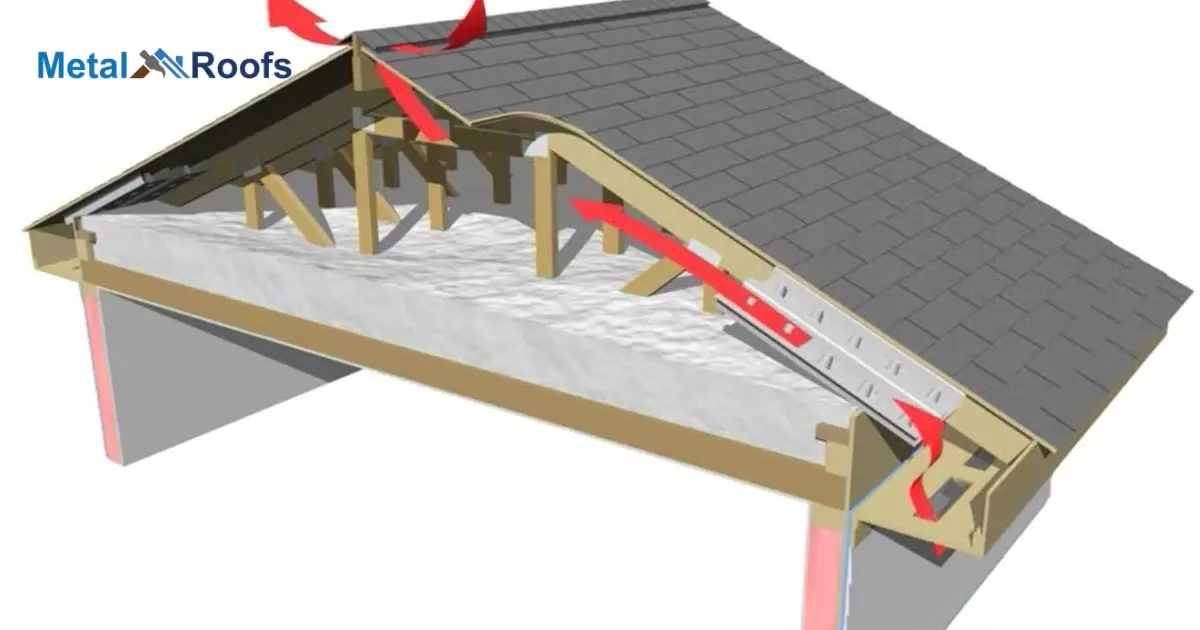
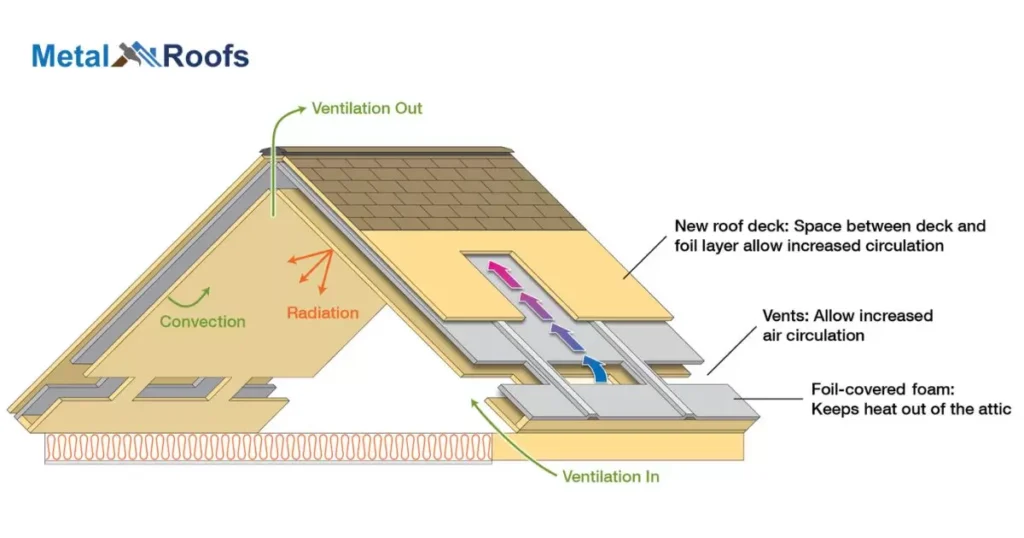
Attic ventilation baffles are a simple, yet crucial, part of your home’s health. Installed in the space between your roof and insulation, these baffles ensure proper airflow. Without them, your attic could turn into a hot, humid mess, leading to potential problems like mold and decreased energy efficiency.
Picture this: In summer, ventilation baffles prevent heat buildup, keeping your attic cool. In winter, they prevent ice dams. These small additions ensure a comfortable and healthy home environment, especially when paired with the longest lasting asphalt shingle.
Why Attic Ventilation Is Important?
Attic ventilation matters. Heat accumulates up there. Without proper airflow, it gets trapped. This heat can damage your roof. Moisture builds up too. Mold and mildew thrive in such conditions. Attic ventilation helps prevent these issues. It keeps your home healthier. Also, it saves energy. Cooling systems work more efficiently. Your utility bills shrink as a result. Remember, a well-ventilated attic is a happy attic.
Good airflow is essential. In winter, it prevents ice dams. These dams can damage your roof. Proper ventilation solves this problem. It keeps the attic cool. So, snow doesn’t melt and refreeze. Your roof stays intact. Plus, ventilation extends your roof’s lifespan. It’s a small investment for big benefits. A well-ventilated attic is key.
Materials Needed For Making Attic Ventilation Baffles
To make attic ventilation baffles, you need foam board for the body, a utility knife for cutting, a staple gun for securing, and a tape measure for precision. Ensure the boards fit between rafters snugly.
For the next set of materials, get safety glasses to protect your eyes, foil tape for sealing seams, a sturdy ladder for access, and patience for a well-crafted result. These materials will help create an energy-efficient and well-ventilated attic space.
How To Measure Your Attic Space For Baffles?
| Step | Measurement | Tool Needed |
| 1 | Width between rafters | Tape measure |
| 2 | Length of cardboard strips | Tape measure, scissors |
| 3 | Consistent spacing | Measuring tape or ruler |
| 4 | Depth of insulation | Tape measure |
| 5 | Overall installation | Staple gun, scissors |
Measuring your attic space for baffles is a straightforward task. Start by grabbing a tape measure, a flashlight, and a helper if possible. Head up to your attic with caution, and determine the distance between the roof and the insulation. This measurement will guide you in selecting the appropriate length for your baffles.
Once you know the space, measure the distance between the roof trusses. This helps you determine the number of baffles needed. Keep an eye out for any obstructions like wiring or vents, as these might affect baffle placement. By taking these simple measurements, you’ll be well on your way to ensuring proper ventilation in your attic space.
Step-By-Step Guide To Making Attic Ventilation Baffles
To begin, gather materials: cardboard, scissors, and a staple gun. Measure the width between rafters accurately. Cut cardboard into strips matching the measurement. This creates the foundation.
Next, install baffles, slide each piece between rafters, snugly fitting. Staple at top and bottom to secure in place. Repeat process, maintaining consistent spacing. Ventilation accomplished.
Cutting The Baffle Material To Size
Now, let’s trim the material. Measure rafters’ width precisely. Cut cardboard accordingly, matching measurements. Accuracy ensures a snug fit. Be meticulous with each cut. Consistent sizing guarantees seamless installation. The foundation is set for effective attic ventilation.
Folding And Assembling The Baffles
Now, let’s tackle folding and assembling. Take the cardboard strips cut earlier. Fold each strip along its length. Create a triangular shape, forming the baffle. Staple the edges together securely. Repeat for all strips.
With baffles assembled, move to installation. Slide each triangular baffle between rafters. Ensure a snug fit. Staple at both ends for stability. Progress through this step for complete attic coverage.
Installing The Baffles In Your Attic Space
Start by gathering supplies: cardboard, scissors, and a staple gun. Measure the gap between rafters accurately. Cut cardboard into strips to match the width. This forms the base for your baffles.
Now, the installation phase: slide each strip between rafters securely. Staple at the top and bottom for a firm hold. Repeat the process, maintaining uniform spacing. Ventilation achieved effortlessly.
Tips For Installing Baffles On Metal Roofs
- Opt for flexible materials like foam or plastic when installing baffles on metal roofs.
- Accurately measure the spacing between rafters for a snug fit of the baffles.
- Cut the baffles precisely to match the measurements, ensuring a proper installation.
- Use screws or nails designed for metal surfaces to securely fasten the baffles in place.
- Tighten the fit to prevent any gaps that may compromise ventilation efficiency.
- Maintain consistent spacing as you work across the metal roof for a uniform installation.
These tips ensure an efficient and reliable installation process for baffles on metal roofs.
Common Mistakes To Avoid When Making Baffles
Firstly, measure accurately; errors here lead to ill-fitting baffles. Use proper materials like sturdy cardboard for longevity. Avoid uneven spacing during installation; consistency is key. Skipping the stapling step compromises the baffles’ stability.
Secondly, disregard hasty cutting; precision ensures a snug fit. Neglecting to clear obstructions before installation causes complications. Overlooking uniformity in strip width hampers the ventilation process. Lastly, don’t overlook safety measures – stapling requires caution.
How To Maintain Attic Ventilation Baffles?
To sustain attic ventilation baffles, inspect annually. Check for any blockages or damage. Remove debris to ensure airflow remains unobstructed. Swift action prevents potential issues.
Monitor insulation levels routinely. Maintain proper depth to enhance effectiveness. Replace or add insulation when needed. Consistent attention preserves a well-ventilated attic space.
Frequently Asked Questions
What can you use instead of attic baffles?
Consider using rigid foam insulation or cardboard as alternatives to attic baffles.
What is the best way to baffle an attic?
Install cardboard strips snugly between rafters, stapling securely at top and bottom for effective attic baffling.
Can you use cardboard for attic baffles?
Yes, cardboard is suitable for attic baffles. Cut it into strips, slide between rafters, and staple for effective ventilation.
Conclusion
In conclusion, mastering how to make attic ventilation baffles proves straightforward and vital. The process, involving cardboard, scissors, and a staple gun, ensures effective airflow. By following the step-by-step guide, you guarantee a well-ventilated attic space.
Proper installation, with attention to measurements and secure stapling, establishes a durable foundation. Regular maintenance, such as yearly inspections and debris removal, safeguards continuous airflow. Monitoring insulation levels further contributes to the longevity and efficiency of the baffles. Embracing these practices, you optimize attic ventilation effortlessly.